Key takeaways
- Usable width: Measure the tire’s actual contact width, then leave at least 1 inch of platform on each side. A 9-inch usable surface may suit narrow car tires, while 10 to 12 inches is more forgiving for SUVs and trucks.
- Weight capacity: Use the vehicle’s gross vehicle weight rating as a conservative starting point, divide it by two for the front axle, then add a safety margin. Capacity must apply to each ramp, not merely to the pair.
- Approach angle: A ramp’s angle depends on its height and length. A long ramp with a gradual transition is usually safer for low vehicles than a short ramp of the same height.
- Traction: Look for a textured driving surface, molded tread, or a positive way to stop the ramp from sliding. Smooth plastic and dusty concrete are a poor combination.
- Run-off and retention: A raised stop at the top, a level platform, and a rear lip help keep the tire centered and prevent overdriving.
The best car ramps for oil changes are low-profile ramps with a wide, grippy platform, a confirmed per-ramp capacity above your vehicle’s tire load, and enough length to avoid scraping the bumper or underbody.
Our top picks


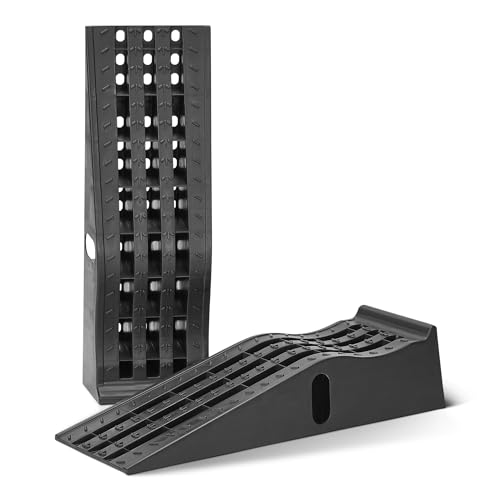

As an Amazon Associate we earn from qualifying purchases at no extra cost to you. Ratings are shown as listed on Amazon.
What to compare before buying
Ramp height is the first specification most shoppers notice, but it is not the most important one by itself. A taller ramp creates more working room beneath the vehicle, yet it also needs a longer approach to maintain a manageable angle. For many passenger cars, a 5.5- to 7-inch lift is a practical compromise. Taller 8- to 10-inch ramps can be useful for trucks and SUVs, but they are more difficult to store and may be unsuitable for low front splitters.
Check the following measurements rather than relying on the word “universal”:
- Usable width: Measure the tire’s actual contact width, then leave at least 1 inch of platform on each side. A 9-inch usable surface may suit narrow car tires, while 10 to 12 inches is more forgiving for SUVs and trucks.
- Weight capacity: Use the vehicle’s gross vehicle weight rating as a conservative starting point, divide it by two for the front axle, then add a safety margin. Capacity must apply to each ramp, not merely to the pair.
- Approach angle: A ramp’s angle depends on its height and length. A long ramp with a gradual transition is usually safer for low vehicles than a short ramp of the same height.
- Traction: Look for a textured driving surface, molded tread, or a positive way to stop the ramp from sliding. Smooth plastic and dusty concrete are a poor combination.
- Run-off and retention: A raised stop at the top, a level platform, and a rear lip help keep the tire centered and prevent overdriving.
Best car ramps for oil changes by situation
Best general choice: wide, low-profile plastic ramps
For most sedans, hatchbacks, crossovers, and light SUVs, a pair of molded plastic ramps around 6 to 7 inches high is the easiest choice. They are lighter than steel ramps, do not rust, and usually have molded traction channels. Choose a model with at least 10 inches of usable width and a clearly stated capacity of 6,000 pounds or more per pair.
Plastic ramps are particularly convenient for occasional oil changes because they can be carried by one person and stored vertically. Their weakness is temperature and surface sensitivity: they should be inspected for cracks, distortion, and damaged tread, especially after years in a hot garage or shed.
Best for low sports cars: long, gradual race ramps
Low-profile composite ramps, such as Race Ramps’ RR-series designs, favor approach angle over maximum height. A typical low-profile design may rise only about 5.5 inches but extend roughly 56 inches, creating a gentler climb than a short utility ramp. That extra length can prevent a front lip, splitter, or low exhaust component from contacting the ramp.
These ramps are often lighter and cleaner than steel alternatives, but they can cost more. They are a strong fit if your priority is getting a low vehicle onto ramps without using separate approach extensions. Confirm the exact model’s width and capacity: some narrow racing ramps are intended for tires with a limited contact width.
Best for trucks and frequent use: heavy-duty steel ramps
Steel service ramps are appropriate for pickup trucks, full-size SUVs, and owners who perform maintenance frequently. Their advantages are rigidity, resistance to deformation, and a stable feel under heavier vehicles. Many have welded side rails, expanded-metal or punched-steel tread, and a broad upper platform.
The tradeoff is weight. A pair can be difficult to move and occupies more floor space. Steel also needs occasional inspection for bent welds, corrosion, and loose rubber feet. A heavy-duty ramp is not automatically safer if you cannot position it squarely or cannot move it without dropping it.
Best for limited garage space: stackable or folding ramps
Compact ramps help when storage is the main constraint, but inspect their locking mechanism and hinge area carefully. A folding ramp must lock fully before loading, and a stackable plastic ramp should not be used if its nested sections are not seated evenly. Measure the folded dimensions and the ramp’s actual driving surface; compact packaging can mean a narrow platform or a steep approach.
Head-to-head comparison
| Ramp type | Typical lift | Typical usable width | Typical pair capacity | Approximate pair weight | Best use |
|---|---|---|---|---|---|
| Low-profile composite | 5–6 in | 8–10 in | 3,000–6,000 lb | 10–25 lb | Sports cars and low front ends |
| Wide molded plastic | 6–8.5 in | 10–12 in | 6,000–16,000 lb | 15–35 lb | Most cars, crossovers, and light SUVs |
| Heavy-duty steel | 6–12 in | 10–14 in | 8,000–20,000 lb | 35–80 lb | Trucks and frequent service |
| Folding or compact | 5–8 in | 8–11 in | 3,000–8,000 lb | 15–45 lb | Small garages and occasional use |
These are useful comparison ranges, not a substitute for the manufacturer’s label. Capacity, dimensions, and construction differ substantially between models in the same category.
How to calculate the capacity you need
Suppose a crossover has a gross vehicle weight rating of 5,000 pounds. Dividing that figure by two gives 2,500 pounds on the front axle in a conservative full-vehicle calculation. Adding a 25 percent margin produces 3,125 pounds for the pair, or 1,563 pounds per ramp.
That calculation does not mean a 3,200-pound pair rating is appropriate in every situation. Check the ramp maker’s definition of capacity, keep the vehicle centered, and account for cargo, passengers, uneven loading, and the possibility that the front axle carries more than half the vehicle’s weight. For a truck, selecting a ramp with substantially more capacity than the calculation requires is sensible.
Choosing the right height and approach angle
Measure the clearance from the floor to the vehicle’s lowest point near the front wheels, then compare it with the ramp’s transition. A ramp can be low enough in total height but still scrape because its first section rises abruptly.
If the car has a low bumper, place a straightedge or board from the tire’s floor contact point toward the underside of the front bumper. The ramp should remain below that line during the climb. If it does not, use a longer ramp, an approved ramp extension, or a lower-height model. Do not improvise with loose wood blocks, bricks, or stacked materials.
A 7-inch ramp that is 40 inches long has a steeper climb than a 7-inch ramp that is 60 inches long. The longer option generally provides a better approach angle, although it requires more garage depth.
Safe setup for an oil change
- Park on a flat, hard, dry surface. Concrete is preferable to gravel, asphalt softened by heat, or a sloped driveway.
- Inspect both ramps for cracks, bent metal, loose fasteners, damaged tread, and oil contamination.
- Place the ramps directly in front of the tires and align them parallel with the vehicle. Use the manufacturer’s recommended anti-slip method if the ramps tend to move.
- Drive up slowly in the lowest practical gear, keeping the steering wheel straight. Stop when the tires are fully on the upper platforms and against the intended stops.
- Set the parking brake, select park or first gear, and turn off the engine. Chock the tires that remain on the ground.
- Use a separate jack stand or suitable support whenever the vehicle manufacturer or ramp instructions require it. Never rely on a hydraulic jack as the only support beneath a vehicle.
- After the oil change, start the engine only if the vehicle is safely supported as directed, check for leaks, then drive down slowly and straight.
Ownership realities and common mistakes
The tread surface usually wears before the main body of a plastic ramp fails. Repeated tire spin can polish the texture, while oil and coolant reduce friction. Clean spills promptly with a compatible degreaser and let the ramp dry before storage. Do not paint over traction surfaces or drill the structure without the manufacturer’s approval.
Steel ramps commonly develop surface rust at welds, feet, and drainage holes. Remove loose rust, keep the ramp dry, and retire it if a weld is cracked, a support is bent, or the upper platform has changed shape. Never exceed the stated capacity because a ramp “looks strong.”
Three frequent errors are using only the pair’s combined capacity, placing ramps on a slope, and choosing a ramp that is too narrow for the tire. Measure the tire and garage space first. For most owners, a wide 6- to 8.5-inch molded ramp is the best balance; choose a long low-profile composite ramp for a sports car, or a high-capacity steel ramp for a heavy truck and regular workshop use.